Depending on its size and engineering, your building’s roof frame may or may not require truss bracing. The instructions for your specific building will tell you whether or not bracing is needed. In general, though:
- Buildings from 10’ to 18’ wide do not require truss bracing.
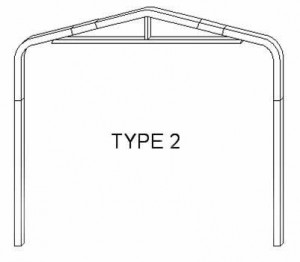
- Buildings 20’ wide often require Type 2 or “post-truss” bracing.
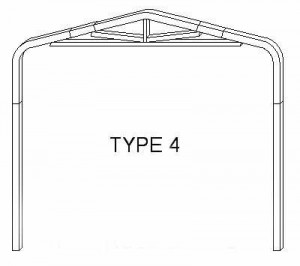
- Buildings 24’ wide or wider may require either Type 2 or Type 4 (“tri-truss”) bracing.
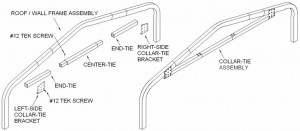
One element that is common to both types of truss bracing is the collar tie. This is a horizontal cross-piece at the bottom of the truss assembly.
 |
 |
The collar-tie itself is made up of three parts: a center-tie, and 2 end-ties. The lengths of these parts vary, depending on your metal building’s dimensions. Exact lengths will be found in the instructions in your steel building kit.
METAL BUILDING COLLAR-TIE ASSEMBLY
To assemble the collar-ties:
- Slip an end-tie onto each end of the center-tie.
- Fasten each end-tie in place with four #12 x 1” self-drilling Tek screws. Make certain the assembly remains straight while you install the screws.
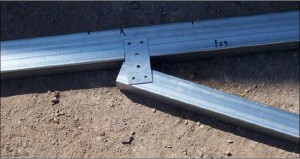
- Place a left collar-tie bracket at the left end of the collar-tie assembly and fasten it in place with six #12 x 1” self-drilling Tek screws.
- Repeat step 3 on the right side, using a right collar-tie bracket.
INSTALLING THE COLLAR-TIE ASSEMBLY
Attach the collar-tie assembly to a roof/wall frame assembly:
- Center the collar-tie in the roof/wall frame. The distance from the center of the roof/wall frame’s peak to the point where the collar tie will be attached should be the same on both left and right.
- Fasten each collar-tie bracket to the roof/wall frame with six #12 x 1” self-drilling Tek screws.
- Repeat steps 1 and 2 with the rest of your collar-ties and roof/wall frame assemblies.
* NOTE: the roof/wall frame assemblies for the building’s front wall and rear wall do not require truss bracing. This means you will have 2 more roof/wall frame assemblies than you have collar-ties.
TRUSS ASSEMBLY – TYPE 2 (POST-TRUSS)
- Locate and mark the center of the peak component (center of the roof/wall frame assembly).
- Locate and mark the center of the collar-tie assembly.
- Center the vertical post brace using the reference marks at the peak component and collar-tie centers.
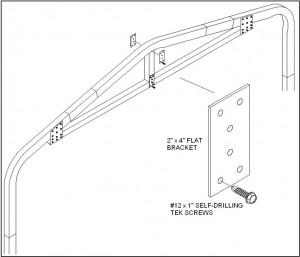
- Fasten the top of the vertical post brace to the peak with two 2” x 4” flat brackets (one on the front, another on the back) using six #12 x 1” self-drilling Tek screws per bracket. (Note: Make certain that the post brace remains centered and perpendicular to the collar-tie while you fasten the screws.)
- Fasten the bottom of the vertical post brace to the collar-tie with one 2” x 4” flat bracket with six #12 x 1” self-drilling Tek screws.
- Repeat steps1-5 for the remaining truss assemblies.
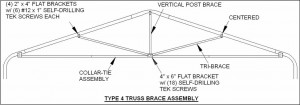
TRUSS ASSEMBLY – TYPE 4 (TRI-TRUSS)
- Locate and mark the center of the peak component (center of the roof/wall frame assembly).
- Locate and mark the center of the collar-tie assembly.
- Center the vertical post brace using the reference marks at the peak component and collar-tie centers.
- Fasten the top of the vertical post brace to the peak with two 2” x 4” flat brackets (one on the front, another on the back) using six #12 x 1” self-drilling Tek screws per bracket. (Note: Make certain that the post brace remains centered and perpendicular to the collar-tie while you fasten the screws.)
- Fasten the bottom of the vertical post brace to the collar-tie with one 4” x 6” flat bracket with six #12 x 1” self-drilling Tek screws.
- Place a tri-brace on one side of the truss assembly, flush against collar-tie and the vertical post brace 4” x 6” flat bracket. Then position the opposite end of the tri-brace so it is flush against the rafter.
- Fasten the top of the tri-brace to the rafter using one 2” x 4” flat bracket, with six #12×1” self-drilling Tek screws.
- Fasten the bottom of the tri-brace flush against the 4” x 6” flat bracket, with three #12 x 1” self-drilling Tek screws.
- Repeat steps 6-8 for opposite side of the truss assembly.
- Repeat steps 1-9 for remaining truss assemblies.
Install 2″ x 4″ flat bracket on one side only, at end connection of tri-brace to rafter
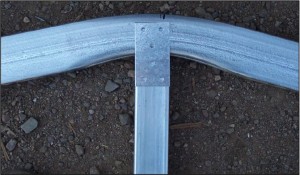
Install 2″ x 4″ flat bracket on both sides of the vertical post brace to peak (post brace-to-peak connection only)
With your truss braces complete, you’re ready for the next step – erecting the roof wall assemblies.

