The framing system for your roof and walls is made up of a series of individual frame assemblies – “ribs” that go upward from the base rail on one side of the building, over the top to support the roofing panels, then down to the opposite base rail.
Once your base rails have been assembled and anchored, your next step is to put together the roof/wall frame assemblies.
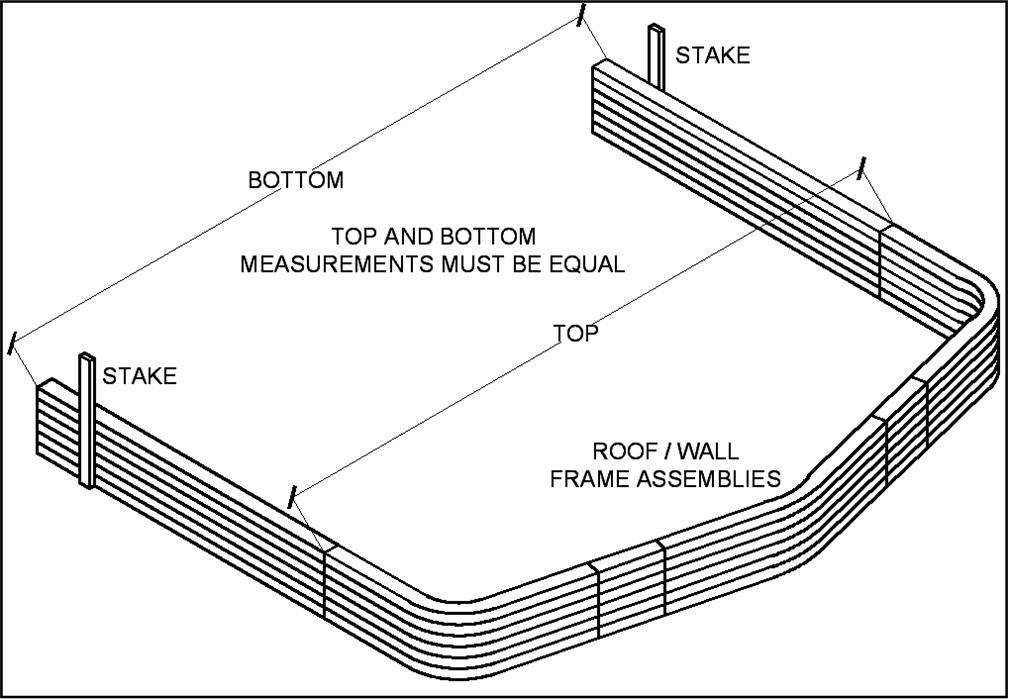
To make sure all the assemblies are exactly the same, it’s best to assemble them one on top of the other, as shown below. This makes for a more uniform final building, and makes it easier to install roofing and siding panels.
Follow these steps to put the roof/wall assemblies together:
1. If your building design includes corner angle brackets (also called eave brackets), they will have been shipped to you unfolded. Fold all brackets as shown below. (If your building does not include corner angle brackets, skip ahead to step 5.)

2. Place a corner bracket on a side post bent corner, squaring it up with the side post’s roof and side portions.
3. Attach the corner bracket using 8 self-drilling screws, as shown in the illustration.
4. Using this first assembly as a guide (to make sure all assemblies are the same) repeat steps 2 and 3 with the rest of your steel building’s side posts.
5. Pound two stakes into the ground, so that the distance from the inside of one to the inside of the other is the same as the width of your building. For example, if your building is to be 12’ wide, the distance from stake to stake should be 12’.
6. Place your first assembly between the stakes – the bottom of each “leg” should be inside the stake on each side.
7. Take a measurement across the bottom of the legs. Then measure across the assembly at the point where the height extension (leg) meets the side bend piece. Adjust the slip joints between rafters and side bends as needed so this measurement is the same as the first measurement (across the bottoms of the legs).
8. Fasten all joints using #12 x 1” self-drilling screws. Use 4 screws where the peak section meets each rafter piece. Use 2 screws for all other joints (rafter to side bend, and side bend piece to height extension or “leg”).
9. Using this first assembly as a template, put together the rest of your roof/wall assemblies. You can stack them up as you go, so it will be easier to make them all the same.
10. If your building design includes hat channel for attachment of roof panels (this will be shown in your building’s instruction booklet) use the reference chart in your instruction booklet to mark the roof/wall frame assemblies:
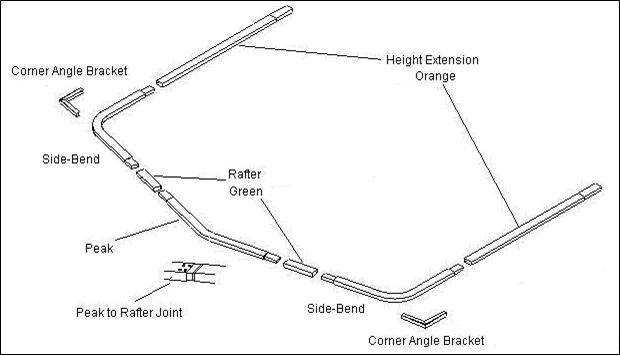
11. Put together the first roof/wall assembly: on the ground, assemble 1 peak, 2 rafters, 2 side posts, and 2 height extensions, as shown. Just slip the parts together – do not fasten with screws at this step.
a. First mark the top assembly in your stack, double-checking against the chart to ensure all marks are correctly spaced.
b. Finally, using a straight-edge, mark all the rest of the roof/wall assemblies to match your marks on the top assembly.
Taking the time to do this step will eliminate having to measure and mark the frame assemblies once they are standing, also saving many trips up and down the ladder. Once the hat channel is in place, it will act as a straight edge; when properly placed, it will ensure the walls are straight, improving the overall your building’s appearance.

